Archives 2022

Project – Strategy – Strategy, Abstract Factory, and Singleton Design Patterns-1

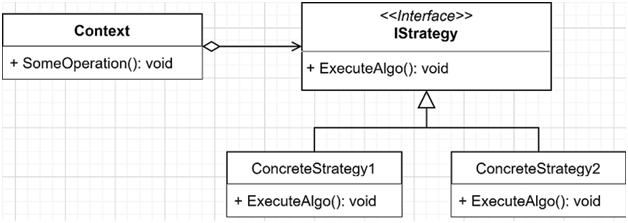
Context: We want to sort a collection differently, eventually even using different sort algorithms (out of the scope of the example but possible). Initially, we want to support sorting the elements of any collection in ascending or descending order.To achieve this, we need to implement the following building blocks:

  • The Context is the SortableCollection class.
  • The IStrategy is the ISortStrategy interface.
  • The concrete strategies are:
  • SortAscendingStrategy
  • SortDescendingStrategy

The consumer is a small REST API that allows the user to change the strategy, sort the collection, and display the items. Let’s start with the ISortStrategy interface:

public interface ISortStrategy
{
    IOrderedEnumerable<string> Sort(IEnumerable<string> input);
}

That interface contains only one method that expects a string collection as input and returns an ordered string collection. Now let’s inspect the two implementations:

public class SortAscendingStrategy : ISortStrategy
{
    public IOrderedEnumerable<string> Sort(IEnumerable<string> input)
        => input.OrderBy(x => x);
}
public class SortDescendingStrategy : ISortStrategy
{
    public IOrderedEnumerable<string> Sort(IEnumerable<string> input)
        => input.OrderByDescending(x => x);
}

Both implementations are super simple, using Language Integrated Query (LINQ) to sort the input and return the result directly.

Tip

When using expression-bodied methods, please ensure you do not make the method harder to read for your colleagues (or future you) by creating very complex one-liners. Writing multiple lines often makes the code easier to read.

The next building block to inspect is the SortableCollection class. It is composed of multiple string items (the Items property) and can sort them using an ISortStrategy. On top of that, it implements the IEnumerable<string> interface through its Items property, making it iterable. Here’s the class:

using System.Collections;
using System.Collections.Immutable;
namespace MySortingMachine;
public sealed class SortableCollection : IEnumerable<string>
{
    private ISortStrategy _sortStrategy;
    private ImmutableArray<string> _items;
    public IEnumerable<string> Items => _items;
    public SortableCollection(IEnumerable<string> items)
    {
        _items = items.ToImmutableArray();
        _sortStrategy = new SortAscendingStrategy();
    }
    public void SetSortStrategy(ISortStrategy strategy)
        => _sortStrategy = strategy;
    public void Sort()
    {
        _items = _sortStrategy
            .Sort(Items)
            .ToImmutableArray()
        ;
    }
    public IEnumerator<string> GetEnumerator()
        => Items.GetEnumerator();
    IEnumerator IEnumerable.GetEnumerator()
        => ((IEnumerable)Items).GetEnumerator();
}

The SortableCollection class is the most complex one so far, so let’s take a more in-depth look:

  • The _sortStrategy field references the algorithm: an ISortStrategy implementation.
  • The _items field references the strings themselves.
  • The Items property exposes the strings to the consumers of the class.
  • The constructor initializes the Items property using the items parameter and sets the default sorting strategy.
  • The SetSortStrategy method allows consumers to change the strategy at runtime.
  • The Sort method uses the _sortStrategy field to sort the items.
  • The two GetEnumerator methods represent the implementation of the IEnumerable<string> interface and make the class enumerable through the Items property.

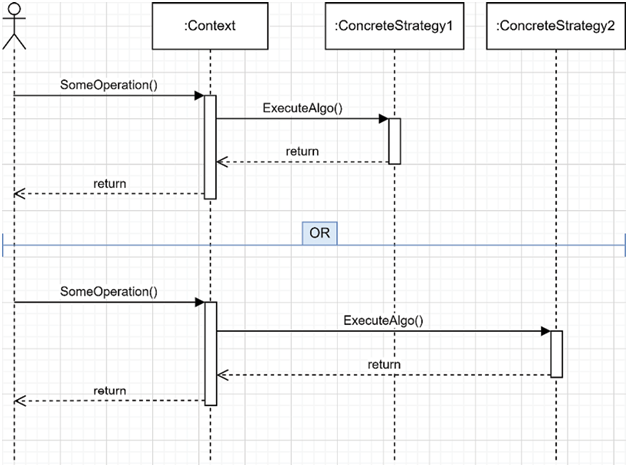
With that code, we can see the Strategy pattern in action. The _sortStrategy field represents the current algorithm, respecting an ISortStrategy contract, which is updatable at runtime using the SetSortStrategy method. The Sort method delegates the work to the ISortStrategy implementation (the concrete strategy). Therefore, changing the value of the _sortStrategy field leads to a change of behavior of the Sort method, making this pattern very powerful yet simple. The highlighted code represents this pattern.

The Strategy design pattern – Strategy, Abstract Factory, and Singleton Design Patterns

Before you begin: Join our book community on Discord

Give your feedback straight to the author himself and chat to other early readers on our Discord server (find the “architecting-aspnet-core-apps-3e” channel under EARLY ACCESS SUBSCRIPTION).

https://packt.link/EarlyAccess

This chapter explores object creation using a few classic, simple, and yet powerful design patterns from the Gang of Four (GoF). These patterns allow developers to encapsulate and reuse behaviors, centralize object creation, add flexibility to our designs, or control object lifetime. Moreover, you will most likely use some of them in all software you build directly or indirectly in the future.

GoF

Erich Gamma, Richard Helm, Ralph Johnson, and John Vlissides are the authors of Design Patterns: Elements of Reusable Object-Oriented Software (1994), known as the Gang of Four (GoF). In that book, they introduce 23 design patterns, some of which we revisit in this book.

Why are they that important? Because they are the building blocks of robust object composition and help create flexibility and reliability. Moreover, in Chapter 8, Dependency Injection, we make those patterns even more powerful!But first things first. In this chapter, we cover the following topics:

  • The Strategy design pattern
  • The Abstract Factory design pattern
  • The Singleton design pattern

The Strategy design pattern

The Strategy pattern is a behavioral design pattern that allows us to change object behaviors at runtime. We can also use this pattern to compose complex object trees and rely on it to follow the Open/Closed Principle (OCP) without much effort. Moreover, it plays a significant role in the composition over inheritance way of thinking. In this chapter, we focus on the behavioral part of the Strategy pattern. The next chapter covers how to use the Strategy pattern to compose systems dynamically.

Goal

The Strategy pattern aims to extract an algorithm (a strategy) from the host class needing it (the context or consumer). That allows the consumer to decide on the strategy (algorithm) to use at runtime.For example, we could design a system that fetches data from two different types of databases. Then we could apply the same logic to that data and use the same user interface to display it. To achieve this, we could use the Strategy pattern to create two strategies, one named FetchDataFromSql and the other FetchDataFromCosmosDb. Then we could plug the strategy we need at runtime in the context class. That way, when the consumer calls the context, the context does not need to know where the data comes from, how it is fetched, or what strategy is in use; it only gets what it needs to work, delegating the fetching responsibility to an abstracted strategy (an interface).

Design

Before any further explanation, let’s take a look at the following class diagram:

 Figure 7.1: Strategy pattern class diagramFigure 7.1: Strategy pattern class diagram 

Based on the preceding diagram, the building blocks of the Strategy pattern are the following:

  • Context is a class that depends on the IStrategy interface and leverages an implementation of the IStrategy interface to execute the ExecuteAlgo method.
  • IStrategy is an interface defining the strategy API.
  • ConcreteStrategy1 and ConcreteStrategy2 represent one or more different concrete implementations of the IStrategy interface.

In the following diagram, we explore what happens at runtime. The actor represents any code consuming the Context object.

 Figure 7.2: Strategy pattern sequence diagramFigure 7.2: Strategy pattern sequence diagram 

When the consumer calls the Context.SomeOperation() method, it does not know which implementation is executed, which is an essential part of this pattern. The Context class should not be aware of the strategy it uses either. It should run the strategy through the interface, unaware of the implementation. That is the strength of the Strategy pattern: it abstracts the implementation away from both the Context class and its consumers. Because of that, we can change the strategy during either the object creation or at runtime without the object knowing, changing its behavior on the fly.

Note

We could even generalize that last sentence and extend it to any interface. Depending on an interface breaks the ties between the consumer and the implementation by relying on that abstraction instead.

Conclusion – Model-View-Controller

A data transfer object allows us to design an API endpoint with a specific data contract (input and output) instead of exposing the domain or data model. This separation between the presentation and the domain is a crucial element that leads to having multiple independent components instead of a bigger, more fragile one. Using DTOs to control the inputs and outputs gives us more control over what the clients can do or receive.Using the data transfer object pattern helps us follow the SOLID principles in the following ways:

  • S: A DTO adds clear boundaries between the domain model and the API contract. Moreover, having an input and an output DTO help further separate the responsibilities.
  • O: N/A
  • L: N/A
  • I: A DTO is a small, specifically crafted data contract (abstraction) with a clear purpose in the API contract.
  • D: Due to those smaller interfaces (ISP), DTOs allow changing the implementation details of the endpoint without affecting the clients because they depend only on the API contract (an abstraction).

You have learned DTOs’ added value, their role in an API contract, and the ASP.NET Core MVC framework.

Summary

This chapter explored the Model-View-Controller (MVC) design pattern, a well-established framework in the ASP.NET ecosystem that offers more advanced features than its newer Minimal APIs counterpart. Minimal APIs are not competing against MVC; we can use them together. The MVC pattern emphasizes the separation of concerns, making it a proven pattern for creating maintainable, scalable, and robust web applications. We broke down the MVC pattern into its three core components: Models, Views, and Controllers. Models represent data and business logic, Views are user-facing components (serialized data structures), and Controllers act as intermediaries, mediating the interaction between Models and Views. We also discussed using Data Transfer Objects (DTOs) to package data in the format we need, providing many benefits, including flexibility, efficiency, encapsulation, and improved performance. DTOs are a crucial part of the API contract.Now that we have explored principles and methodologies, it is time to continue our learning and tackle more design patterns and features. The following two chapters explore our first Gang of Four (GoF) design patterns and deep dive into ASP.NET Core dependency injection (DI). All of this will help us to continue on the path we started: to learn the tools to design better software.

Raw CRUD Controller – Model-View-Controller

Many issues can arise if we create a CRUD controller to manage the customers directly (see RawCustomersController.cs). First, a little mistake from the client could erase several data points. For example, if the client forgets to send the contracts during a PUT operation, that would delete all the contracts associated with that customer. Here’s the controller code:

// PUT raw/customers/1
[HttpPut(“{id}”)]
public async Task<ActionResult<Customer>> PutAsync(
    int id,
    [FromBody] Customer value,
    ICustomerRepository customerRepository)
{
    var customer = await customerRepository.UpdateAsync(
        value,
        HttpContext.RequestAborted);
    if (customer == null)
    {
        return NotFound();
    }
    return customer;
}

The highlighted code represents the customer update. So to mistakenly remove all contracts, a client could send the following HTTP request (from the MVC.API.http file):

PUT {{MVC.API.BaseAddress}}/customers/1
Content-Type: application/json
{
  “id”: 1,
  “name”: “Some new name”,
  “contracts”: []
}

That request would result in the following response entity:

{
  “id”: 1,
  “name”: “Some new name”,
  “contracts”: []
}

Previously, however, that customer had contracts (seeded when we started the application). Here’s the original data:

{
  “id”: 1,
  “name”: “Jonny Boy Inc.”,
  “contracts”: [
    {
      “id”: 1,
      “name”: “First contract”,
      “description”: “This is the first contract.”,
      “status”: {
        “totalWork”: 100,
        “workDone”: 100,
        “state”: “Completed”
      },
      “primaryContact”: {
        “firstName”: “John”,
        “lastName”: “Doe”,
        “email”: “[email protected]
      }
    },
    {
      “id”: 2,
      “name”: “Some other contract”,
      “description”: “This is another contract.”,
      “status”: {
        “totalWork”: 100,
        “workDone”: 25,
        “state”: “InProgress”
      },
      “primaryContact”: {
        “firstName”: “Jane”,
        “lastName”: “Doe”,
        “email”: “[email protected]
      }
    }
  ]
}

As we can see, by exposing our entities directly, we are giving a lot of power to the consumers of our API. Another issue with this design is the dashboard. The user interface would have to calculate the statistics about the contracts. Moreover, if we implement paging the contracts over time, the user interface could become increasingly complex and even overquery the database, hindering our performance.

I implemented the entire API, which is available on GitHub but without UI.

Next, we explore how we can fix those two use cases using DTOs.

Conclusion – Model-View-Controller

This section explored the MVC pattern, how to create controllers and action methods, and how to route requests to those actions.We could talk about MVC for the remainder of the book, but we would be missing the point. The subset of features we covered here should be enough theory to fill the gap you might have had and allow you to understand the code samples that leverage ASP.NET Core MVC.Using the MVC pattern helps us follow the SOLID principles in the following ways:

  • S: The MVC pattern divides the rendering of a data structure into three different roles. The framework handles most of the serialization portion (the View), leaving us only two pieces to manage: the Model and the Controller.
  • O: N/A
  • L: N/A
  • I: Each controller handles a subset of features and represents a smaller interface into the system. MVC makes the system easier to manage than having a single entry point for all routes, like a single controller.
  • D: N/A

Next, we explore the Data Transfer Object pattern to isolate the API’s model from the domain.

Using MVC with DTOs

This section explores leveraging the Data Transfer Object (DTO) pattern with the MVC framework.

This section is the same as we explore in Chapter 5, Minimal APIs, but in the context of MVC. Moreover, the two code projects are part of the same Visual Studio solution for convenience, allowing you to compare the two implementations.

Goal

As a reminder, DTOs aim to control the inputs and outputs of an endpoint by decoupling the API contract from the application’s inner workings. DTOs empower us to define our APIs without thinking about the underlying data structures, leaving us to craft our REST APIs how we want.

We discuss REST APIs and DTOs more in-depth in Chapter 4, REST APIs.

Other possible objectives are to save bandwidth by limiting the amount of information the API transmits, flattening the data structure, or adding API features that cross multiple entities.

Design

Let’s start by analyzing a diagram that expands MVC to work with DTOs:

 Figure 6.2: MVC workflow with a DTOFigure 6.2: MVC workflow with a DTO 

DTOs allow the decoupling of the domain from the view (data) and empower us to manage the inputs and outputs of our REST APIs independently from the domain. The controller still manipulates the domain model but returns a serialized DTO instead.

Project – MVC API

This code sample is the same as in the previous chapter but uses the MVC framework instead of Minimal APIs.Context: we must build an application to manage customers and contracts. We must track the state of each contract and have a primary contact in case the business needs to contact the customer. Finally, we must display the number of contracts and the number of opened contracts for each customer on a dashboard.As a reminder, the model is the following:

namespace Shared.Models;
public record class Customer(
    int Id,
    string Name,
    List<Contract> Contracts
);
public record class Contract(
    int Id,
    string Name,
    string Description,
    WorkStatus Status,
    ContactInformation PrimaryContact
);
public record class WorkStatus(int TotalWork, int WorkDone)
{
    public WorkState State =>
        WorkDone == 0 ?
WorkState.New :
        WorkDone == TotalWork ?
WorkState.Completed :
        WorkState.InProgress;
}
public record class ContactInformation(
    string FirstName,
    string LastName,
    string Email
);
public enum WorkState
{
    New,
    InProgress,
    Completed
}

The preceding code is straightforward. The only piece of logic is the WorkStatus.State property that returns WorkState.New when the work has not yet started on that contract, WorkState.Completed when all the work is completed, or WorkState.InProgress otherwise.The controllers leverage the ICustomerRepository interface to simulate database operations. The implementation is unimportant. It uses a List<Customer> as the database. Here’s the interface that allows querying and updating the data:

using Shared.Models;
namespace Shared.Data;
public interface ICustomerRepository
{
    Task<IEnumerable<Customer>> AllAsync(
        CancellationToken cancellationToken);
    Task<Customer> CreateAsync(
        Customer customer,
        CancellationToken cancellationToken);
    Task<Customer?> DeleteAsync(
        int customerId,
        CancellationToken cancellationToken);
    Task<Customer?> FindAsync(
        int customerId,
        CancellationToken cancellationToken);
    Task<Customer?> UpdateAsync(
        Customer customer,
        CancellationToken cancellationToken);
}

Now that we know about the underlying foundation, we explore a CRUD controller that does not leverage DTOs.

Attribute routing – Model-View-Controller

Attribute routing maps an HTTP request to a controller action. Those attributes decorate the controllers and the actions to create the complete routes. We already used some of those attributes. Nonetheless, let’s visit those attributes:

namespace MVC.API.Controllers.Empty;
[Route(“empty/[controller]”)]
[ApiController]
public class CustomersController : ControllerBase
{
    [HttpGet]
    public Task<IEnumerable<Customer>> GetAllAsync(
        ICustomerRepository customerRepository)
        => throw new NotImplementedException();
    [HttpGet(“{id}”)]
    public Task<ActionResult<Customer>> GetOneAsync(
        int id, ICustomerRepository customerRepository)
        => throw new NotImplementedException();
    [HttpPost]
    public Task<ActionResult> PostAsync(
        [FromBody] Customer value, ICustomerRepository customerRepository)
        => throw new NotImplementedException();
    [HttpPut(“{id}”)]
    public Task<ActionResult<Customer>> PutAsync(
        int id, [FromBody] Customer value,
        ICustomerRepository customerRepository)
        => throw new NotImplementedException();
    [HttpDelete(“{id}”)]
    public Task<ActionResult<Customer>> DeleteAsync(
        int id, ICustomerRepository customerRepository)
        => throw new NotImplementedException();
}

The Route attributes and Http[Method] attributes define what a user should query to reach a specific resource. The Route attribute allows us to define a routing pattern that applies to all HTTP methods under the decorated controller. The Http[Method] attributes determine the HTTP method used to reach that action method. They also offer the possibility to set an optional and additive route pattern to handle more complex routes, including specifying route parameters. Those attributes are beneficial in crafting concise and clear URLs while keeping the routing system close to the controller. All routes must be unique.Based on the code, [Route(“empty/[controller]”)] means that the actions of this controller are reachable through empty/customers (MVC ignores the Controller suffix). Then, the other attributes tell ASP.NET to map specific requests to specific methods:

Routing AttributeHTTP MethodURL
HttpGetGETempty/customers
HttpGet(“{id}”)GETempty/customers/{id}
HttpPostPOSTempty/customers
HttpPut(“{id}”)PUTempty/customers/{id}
HttpDelete(“{id}”)DELETEempty/customers/{id}

 Table 6.3: routing attributes of the example controller and their final URL

As we can see from the preceding table, we can even use the same attribute for multiple actions as long as the URL is unique. In this case, the id parameter is the GET discriminator.Next, we can use the FromBody attribute to tell the model binder to use the HTTP request body to get the value of that parameter. There are many of those attributes; here’s a list:

AttributeDescription
FromBodyBinds the JSON body of the request to the parameter’s type.
FromFormBinds the form value that matches the name of the parameter.
FromHeaderBinds the HTTP header value that matches the name of the parameter.
FromQueryBinds the query string value that matches the name of the parameter.
FromRouteBinds the route value that matches the name of the parameter.
FromServicesInject the service from the ASP.NET Core dependency container.

 Table 6.4: MVC binding sources

ASP.NET Core MVC does many implicit binding, so you don’t always need to decorate all parameters with an attribute. For example, .NET injects the services we needed in the code samples, and we never used the FromServices attribute. Same with the FromRoute attribute.

Now, if we look back at CustomersController, the route map looks like the following (I excluded non-route-related code to improve readability):

URLAction/Method
GET empty/customersGetAllAsync()
GET empty/customers/{id}GetOneAsync(int id)
POST empty/customersPostAsync([FromBody] Customer value)
PUT empty/customers/{id}PutAsync(int id, [FromBody] Customer value)
DELETE empty/customers/{id}DeleteAsync(int id)

 Table 6.5: the map between the URLs and their respective action methods

When designing a REST API, the URL leading to our endpoints should be clear and concise, making it easy for consumers to discover and learn. Hierarchically grouping our resources by responsibility (concern) and creating a cohesive URL space help achieve that goal. Consumers (a.k.a. other developers) should understand the logic behind the endpoints easily. Think about your endpoints as if you were the consumer of the REST API. I would even extend that suggestion to any API; always consider the consumers of your code to create the best possible APIs.

Directory structure – Model-View-Controller-2

The advantage of using a helper method is leveraging the ASP.NET Core MVC mechanism, making our life easier. However, you could manually manage the HTTP response using lower-level APIs like HttpContext or create custom classes that implement the IActionResult interface to hook your custom response classes into the MVC pipeline.Now let’s look at the multiple ways we can use to return data to the client:

Return typeDescription
voidWe can return void and manually manage the HTTP response using the HttpContext class. This is the most low-level and complex way.
TModelWe can directly return the model, which ASP.NET Core will serialize. The problem with this approach is that we don’t control the status code, nor can we return multiple different results from the action.
ActionResult IActionResultWe can return one of those two abstractions. The concrete result can take many forms depending on the implementation that the action method returns. However, doing this makes our API less auto-discoverable by tools like SwaggerGen.
ActionResult<TModel>We can return the TModel directly and other results like a NotFoundResult or a BadRequestResult. This is the most flexible way that makes the API the most discoverable by the ApiExplorer.

 Table 6.2: multiple ways to return data

We start with an example where the actions return an instance of the Model class by leveraging the Ok method (highlighted code):

using Microsoft.AspNetCore.Mvc;
namespace MVC.API.Controllers;
[Route(“api/[controller]”)]
[ApiController]
public class ValuesController : ControllerBase
{
    [HttpGet(“IActionResult”)]
    public IActionResult InterfaceAction()
        => Ok(new Model(nameof(InterfaceAction)));
    [HttpGet(“ActionResult”)]
    public ActionResult ClassAction()
        => Ok(new Model(nameof(ClassAction)));
    // …
   
public record class Model(string Name);
}

The problem with the preceding code is API discoverability. The ApiExplorer can’t know what the endpoints return. The ApiExplorer describes the actions as returning 200 OK but doesn’t know about the Model class.To overcome this limitation, we can decorate our actions with the ProducesResponseType attribute, effectively circumventing the limitation as shown below:

[ProducesResponseType(typeof(Model), StatusCodes.Status200OK)]
public IActionResult InterfaceAction() { …
}

In the preceding code, we specify the return type as the first argument and the status code as the second. Using the constants of the StatusCodes class is a convenient way to reference standard status codes. We can decorate each action with multiple ProducesResponseType attributes to define alternate states, such as 404 and 400.

With ASP.NET Core MVC, we can also define conventions that apply broad rules to our controllers, allowing us to define those conventions once and reuse them throughout our application. I left a link in the Further reading section.

Next, We explore how we can return a Model instance directly. The ApiExplorer can discover the return value of the method this way, so we do not need to use the ProducesResponseType attribute:

[HttpGet(“DirectModel”)]
public Model DirectModel()
    => new Model(nameof(DirectModel));

Next, thanks to class conversion operators (see Appendix A for more info), we can do the same with ActionResult<T>, like this:

[HttpGet(“ActionResultT”)]
public ActionResult<Model> ActionResultT()
    => new Model(nameof(ActionResultT));

The main benefit of using ActionResult<T> is to return other types of results. Here is an example showing this where the method returns either Ok or NotFound:

[HttpGet(“MultipleResults”)]
public ActionResult<Model> MultipleResults()
{
    var condition = Random.Shared
        .GetItems(new[] { true, false }, 1)
        .First();
    return condition
        ?
Ok(new Model(nameof(MultipleResults)))
        : NotFound();
}

However, the ApiExplorer does not know about the 404 Not Found, so we must document it using the ProducesResponseType attribute.

We can return a Task<T> or a ValueTask<T> from the action method when the method body is asynchronous. Doing so lets you write the async/await code from the controller.

I highly recommend returning a Task<T> or a ValueTask<T> whenever possible because it allows your REST API to handle more requests using the same resources without effort. Nowadays, non-Task-based methods in libraries are infrequent, so you will most likely have little choice.

We learned multiple ways to return values from an action. The ActionResult<T> class is the most flexible regarding feature support. On the other hand, IActionResult is the most abstract one.Next, we look at routing requests to those action methods.

Directory structure – Model-View-Controller-1

The default directory structure contains a Controllers folder to host the controllers. On top of that, we can create a Models folder to store your model classes or use any other structure.

While controllers are typically housed in the Controllers directory for organizational purposes, this convention is more for the benefit of developers than a strict requirement. ASP.NET Core is indifferent to the file’s location, offering us the flexibility to structure our project as we see fit.

Section 4, Applications Patterns, explores many ways of designing applications.

Next, we look at the central part of this pattern—the controllers.

Controller

The easiest way to create a controller is to create a class inheriting from ControllerBase. However, while ControllerBase adds many utility methods, the only requirement is to decorate the controller class with the [ApiController] attribute.

By convention, we write the controller’s name in its plural form and suffix it with Controller. For example, if the controller relates to the Employee entity, we’d name it EmployeesController, which, by default, leads to an excellent URL pattern that is easy to understand:

  • Get all employees: /employees
  • Get a specific employee: /employees/{id}
  • And so on.

Once we have a controller class, we must add actions. Actions are public methods that represent the operations that a client can perform. Each action represents an HTTP endpoint.More precisely, the following defines a controller:

  • A controller exposes one or more actions.
  • An action can take zero or more input parameters.
  • An action can return zero or one output value.
  • The action is what handles the HTTP request.

We should group cohesive actions under the same controller, thus creating a loosely coupled unit.

For example, the following represents the SomeController class containing a single Get action:

[Route(“api/[controller]”)]
[ApiController]
public class SomeController : ControllerBase
{
    [HttpGet]
    public IActionResult Get() => Ok();
}

The preceding Get method (action) returns an empty 200 OK response to the client. We can reach the endpoint at the /api/some URI. From there, we can add more actions.

The ControllerBase class gives us access to most of the same utility methods as we had with the Minimal APIs TypedResults class.

Next, we look at returning value.

Returning values

Building a REST API aims to return data to clients and execute remote operations. Most of the plumbing is done for us by the ASP.NET Core code, including serialization.

Most of the ASP.NET Core pipeline is customizable, which is out of the scope of this chapter.

Before returning values, let’s look at a few valuable helper methods provided by the ControllerBase class:

MethodDescription
StatusCodeProduces an empty response with the specified status code. We can optionally include a second argument to serialize in the response body.
OkProduces a 200 OK response, indicating the operation was successful. We can optionally include a second argument to serialize in the response body.
CreatedProduces a 201 Created response, indicating the system created the entity. We can optionally specify the location where to read the entity and the entity itself as arguments. The CreatedAtAction and CreatedAtRoute methods give us options to compose the location value.
NoContentProduces an empty 204 No Content response.
NotFoundProduces a 404 Not Found response, indicating the resource was not found.
BadRequestProduces a 400 Bad Request response, indicating an issue with the client request, often a validation error.
RedirectProduces a 302 Found response, accepting the Location URL as an argument. Different Redirect* methods produce 301 Moved Permanently, 307 Temporary Redirect, and 308 Permanent Redirect responses instead.
AcceptedProduces a 202 Accepted response, indicating the beginning of an asynchronous process. We can optionally specify the location the client can query to learn about the status of the asynchronous operation. We can also optionally specify an object to serialize in the response body. The AcceptedAtAction and AcceptedAtRoute methods give us options to compose the location value.
ConflictProduces a 409 Conflict response, indicating a conflict occurred when processing the request, often a concurrency error.

 Table 6.1: a subset of the ControllerBase methods producing an IActionResult.

Other methods in the ControllerBase class are self-discoverable using IntelliSense (code completion) or in the official documentation. Most, if not all, of what we covered in Chapter 5, Minimal APIs, is also available to controllers.

Goal – Model-View-Controller

In the context of REST APIs, the MVC pattern aims to streamline the process of managing an entity by breaking it down into three separate, interacting components. Rather than struggling with large, bloated blocks of code that are hard to test, developers work with smaller units that enhance maintainability and promote efficient testing. This compartmentalization results in small, manageable pieces of functionality that are simpler to maintain and test.

Design

MVC divides the application into three distinct parts, where each has a single responsibility:

  • Model: The model represents the data and business logic we are modeling.
  • View: The view represents what the user sees. In the context of REST APIs, that usually is a serialized data structure.
  • Controller: The controller represents a key component of MVC. It orchestrates the flow between the client request and the server response. The primary role of the controller is to act as an HTTP bridge. Essentially, the controller facilitates the communication in and out of the system.

The code of a controller should remain minimalistic and not contain complex logic, serving as a thin layer between the clients and the domain.

We explore alternative points of view in Chapter 14, Layering and Clean Architecture.

Here is a diagram that represents the MVC flow of a REST API:

 Figure 6.1: Workflow of a REST API using MVCFigure 6.1: Workflow of a REST API using MVC 

In the preceding diagram, we send the model directly to the client. In most scenarios, this is not ideal. We generally prefer sending only the necessary data portion, formatted according to our requirements. We can design robust API contracts by leveraging the Data Transfer Object (DTO) pattern to achieve that. But before we delve into that, let’s first explore the basics of ASP.NET Core MVC.

Anatomy of ASP.NET Core web APIs

There are many ways to create a REST API project in .NET, including the dotnet new webapi CLI command, also available from Visual Studio’s UI. Next, we explore a few pieces of the MVC framework, starting with the entry point.

The entry point

The first piece is the entry point: the Program.cs file. Since .NET 6, there is no more Startup class by default, and the compiler autogenerates the Program class. As explored in the previous chapter, using the minimal hosting model leads to a simplified Program.cs file with less boilerplate code.Here is an example:

using Shared;
using System.Text.Json.Serialization;
var builder = WebApplication.CreateBuilder(args);
builder.Services.AddCustomerRepository();
builder.Services
    .AddControllers()
    .AddJsonOptions(options => options
        .JsonSerializerOptions
        .Converters
        .Add(new JsonStringEnumConverter())
    )
;
builder.Services.AddEndpointsApiExplorer();
builder.Services.AddSwaggerGen();
var app = builder.Build();
if (app.Environment.IsDevelopment())
{
    app.UseSwagger();
    app.UseDarkSwaggerUI();
}
app.MapControllers();
app.InitializeSharedDataStore();
app.Run();

In the preceding Program.cs file, the highlighted lines identify the minimum code required to enable ASP.NET Core MVC. The rest is very similar to the Minimal APIs code.

The Model View Controller design pattern – Model-View-Controller

Before you begin: Join our book community on Discord

Give your feedback straight to the author himself and chat to other early readers on our Discord server (find the “architecting-aspnet-core-apps-3e” channel under EARLY ACCESS SUBSCRIPTION).

https://packt.link/EarlyAccess

This chapter delves into the Model-View-Controller (MVC) design pattern, a cornerstone of modern software architecture that intuitively structures your code around entities. MVC is perfect for CRUD operations or to tap into the advanced features unavailable in Minimal APIs. The MVC pattern partitions your application into three interrelated parts: Models, Views, and Controllers.

  • Models, which represent our data and business logic.
  • Views, which are the user-facing components.
  • Controllers, that act as intermediaries, mediating the interaction between Models and Views.

With its emphasis on the separation of concerns, the MVC pattern is a proven pattern for creating scalable and robust web applications. In the context of ASP.NET Core, MVC has provided a practical approach to building applications efficiently for years. While we discussed REST APIs in Chapter 4, this chapter provides insight into how to use MVC to create REST APIs. We also address using Data Transfer Objects (DTOs) within this framework.In this chapter, we cover the following topics:

  • The Model-View-Controller design pattern
  • Using MVC with DTOs

Our ultimate goal is clean, maintainable, and scalable code; the ASP.NET Core MVC framework is a favored tool for achieving this. Let’s dive in!

The Model View Controller design pattern

Now that we have explored the basics of REST and Minimal APIs, it is time to explore the MVC pattern to build ASP.NET Core REST APIs.Model-View-Controller (MVC) is a design pattern commonly used in web development. It has a long history of building REST APIs in ASP.NET and is widely used and praised by many.This pattern divides an application into three interconnected components: the Model, the View, and the Controller. A View in MVC formerly represented a user interface. However, in our case, the View is a data contract that reflects the REST API’s data-oriented nature.

Dividing responsibilities this way aligns with the Single Responsibility Principle (SRP) explored in Chapter 3, Architectural Principles. However, this is not the only way to build REST APIs with ASP.NET Core, as we saw in Chapter 5, Minimal APIs.

The new minimal API model mixed with the Request-EndPoint-Response (REPR) pattern can make building REST APIs leaner. We cover that pattern in Chapter 18, Request-EndPoint-Response (REPR). We could see REPR as what ASP.NET Core Razor Pages are to page-oriented web applications, but for REST APIs.

We often design MVC applications around entities, and each entity has a controller that orchestrates its endpoints. We called those CRUD controllers. However, you can design your controller to fit your needs.In the past few decades, the number of REST APIs just exploded to a gazillion; everybody builds APIs nowadays, not because people follow the trend but based on good reasons. REST APIs have fundamentally transformed how systems communicate, offering various benefits that make them indispensable in modern software architecture. Here are a few key factors that contribute to their widespread appeal:

  • Data Efficiency: REST APIs promote efficient data sharing across different systems, fostering seamless interconnectivity.
  • Universal Communication: REST APIs leverage universally recognized data formats like JSON or XML, ensuring broad compatibility and interoperability.
  • Backend Centralization: REST APIs enable the backend to serve as a centralized hub, supporting multiple frontend platforms, including mobile, desktop, and web applications.
  • Layered Backends: REST APIs facilitate the stratification of backends, allowing for the creation of foundational, low-level APIs that provide basic functionalities. These, in turn, can be consumed by higher-level, product-centric APIs that offer specialized capabilities, thus promoting a flexible and modular backend architecture.
  • Security Measures: REST APIs can function as gateways, providing security measures to protect downstream systems and ensuring data access is appropriately regulated—a good example of layering APIs.
  • Encapsulation: REST APIs allow for the encapsulation of specific units of logic into reusable, independent modules, often leading to cleaner, more maintainable code.
  • Scalability: due to their stateless nature, REST APIs are easier to scale up to accommodate increasing loads.

These advantages greatly facilitate the reuse of backend systems across various user interfaces or even other backend services. Consider, for instance, a typical mobile application that needs to support iOS, Android, and web platforms. By utilizing a shared backend through REST APIs, development teams can streamline their efforts, saving significant time and cost. This shared backend approach ensures consistency across platforms while reducing the complexity of maintaining multiple codebases.

We explore different such patterns in Chapter 19, Introduction to Microservices Architecture.