Category What’s an object’s lifetime?

Revisiting the Strategy pattern – Dependency Injection

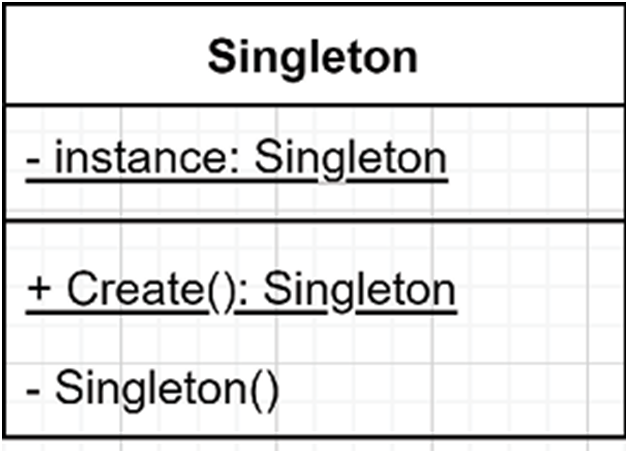
In this section, we leverage the Strategy pattern to compose complex object trees and use DI to dynamically create those instances without using the new keyword, moving away from being control freaks and toward writing DI-ready code.The Strategy pattern is a behavioral design pattern we can use to compose object trees at runtime, allowing extra flexibility and control over objects’ behavior. Composing our objects using the Strategy pattern makes our classes smaller, easier to test and maintain, and puts us on the SOLID path.From now on, we want to compose objects and lower the amount of inheritance to a minimum. We call that principle composition over inheritance. The goal is to inject dependencies (composition) into the current class instead of depending on base class features (inheritance). Additionally, this approach enables us to pull out behaviors and place them in separate classes, adhering to the Single Responsibility Principle (SRP) and Interface Segregation Principle (ISP). We can reuse these behaviors in one or more different classes through their interface, embodying the Dependency Inversion Principle (DIP). This strategy promotes code reuse and composition.The following list covers the most popular ways of injecting dependencies into objects, allowing us to control their behaviors from the outside by composing our objects:

  • Constructor injection
  • Property injection
  • Method injection

We can also get dependencies directly from the container. This is known as the Service Locator (anti-)pattern. We explore the Service Locator pattern later in this chapter.

Let’s look at some theory and then jump into the code to see DI in action.

Constructor injection

Constructor injection consists of injecting dependencies into the constructor as parameters. This is the most popular and preferred technique by far. Constructor injection is useful for injecting required dependencies; you can add null checks to ensure that, also known as the guard clause (see the Adding a guard clause section).

Property injection

The built-in IoC container does not support property injection out of the box. The concept is to inject optional dependencies into properties. Most of the time, you want to avoid doing this because property injection leads to optional dependencies, leading to nullable properties, more null checks, and often avoidable code complexity. So when we think about it, it is good that ASP.NET Core left this one out of the built-in container.You can usually remove the property injection requirements by reworking your design, leading to a better design. If you cannot avoid using property injection, use a third-party container or find a way to build the dependency tree yourself (maybe leveraging one of the Factory patterns).Nevertheless, from a high-level view, the container would do something like this:

  1. Create a new instance of the class and inject all required dependencies into the constructor.
  2. Find extension points by scanning properties (this could be attributes, contextual bindings, or something else).
  3. For each extension point, inject (set) a dependency, leaving unconfigured properties untouched, hence its definition of an optional dependency.

There are a couple of exceptions to the previous statement regarding the lack of support:

  • Razor components (Blazor) support property injection using the [Inject] attribute.
  • Razor contains the @inject directive, which generates a property to hold a dependency (ASP.NET Core manages to inject it).

We can’t call that property injection per se because they are not optional but required, and the @inject directive is more about generating code than doing DI. They are more about an internal workaround than “real” property injection. That is as close as .NET gets from property injection.

I recommend aiming for constructor injection instead. Not having property injection should not cause you any problems. Often, our need for property injection stems from less-than-optimal design choices, whether from our design strategies or a framework we’re utilizing.

Next, we look at method injection.

Project – Registering the Demo Feature – Dependency Injection

Let’s explore registering the dependencies of the Demo Feature. That feature contains the following code:

namespace CompositionRoot.DemoFeature;
public class MyFeature
{
    private readonly IMyFeatureDependency _myFeatureDependency;
    public MyFeature(IMyFeatureDependency myFeatureDependency)
    {
        _myFeatureDependency = myFeatureDependency;
    }
    public void Operation()
    {
        // use _myFeatureDependency
    }
}
public interface IMyFeatureDependency { }
public class MyFeatureDependency : IMyFeatureDependency { }

As we can see, there is nothing complex but two empty classes and an interface. Remember that we are exploring the registration of dependencies, not what to do with them or what they can do—yet.Now, we want the container to serve an instance of the MyFeatureDependency class when a dependency requests the IMyFeatureDependency interface as the MyFeature class does. We want a singleton lifetime.To achieve this, in the Program.cs file, we can write the following code:

builder.Services.AddSingleton<MyFeature>();
builder.Services.AddSingleton<IMyFeatureDependency, MyFeatureDependency>();

We can also chain the two method calls instead:

builder.Services
    .AddSingleton<MyFeature>()
    .AddSingleton<IMyFeatureDependency, MyFeatureDependency>()
;

However, this is not yet elegant. What we want to achieve is this:

builder.Services.AddDemoFeature();

To build that registration method, we can write the following extension method:

using CompositionRoot.DemoFeature;
namespace Microsoft.Extensions.DependencyInjection;
public static class DemoFeatureExtensions
{
    public static IServiceCollection AddDemoFeature(this IServiceCollection services)
    {
        return services
            .AddSingleton<MyFeature>()
            .AddSingleton<IMyFeatureDependency, MyFeatureDependency>()
        ;
    }
}

As highlighted, the registration is the same but uses the services parameter, which is the extended type, instead of the builder.Services (builder does not exist in that class, yet the services parameter is the same object as the builder.Services property).If you are unfamiliar with extension methods, they come in handy for extending existing classes, like we just did. Besides having a static method inside a static class, the this keyword next to the first parameter determines whether it is an extension method.For example, we can build sophisticated libraries that are easy to use with a set of extension methods. Think System.Linq for such a system.Now that we learned the basics of dependency injection, there is one last thing to cover before revisiting the Strategy design pattern.

Using external IoC containers

ASP.NET Core provides an extensible built-in IoC container out of the box. It is not the most powerful IoC container because it lacks some advanced features, but it does the job for most applications.Rest assured; we can change it to another one if need be. You might also want to do that if you are used to another IoC container and want to stick to it.Here’s the strategy I recommend:

  1. Use the built-in container, as per Microsoft’s recommendation.
  2. When you can’t achieve something with it, look at your design and see if you can redesign your feature to work with the built-in container and simplify your design.
  3. If it is impossible to achieve your goal, see if extending the default container using an existing library or coding the feature yourself is possible.
  4. If it is still impossible, explore swapping it for another IoC container.

Assuming the container supports it, it is super simple to swap. The third-party container must implement the IServiceProviderFactory<TContainerBuilder> interface. Then, in the Program.cs file, we must register that factory using the UseServiceProviderFactory<TContainerBuilder> method like this:

var builder = WebApplication.CreateBuilder(args);
builder.Host.UseServiceProviderFactory<ContainerBuilder>(new ContainerBuilderFactory());

In this case, the ContainerBuilder and ContainerBuilderFactory classes are just wrappers around ASP.NET Core, but your third-party container of choice should provide you with those types. I suggest you visit their documentation to know more.Once that factory is registered, we can configure the container using the ConfigureContainer<TContainerBuilder> method and register our dependencies as usual, like this:

builder.Host.ConfigureContainer<ContainerBuilder>((context, builder) =>
{
    builder.Services.AddSingleton<Dependency1>();
    builder.Services.AddSingleton<Dependency2>();
    builder.Services.AddSingleton<Dependency3>();
});

That’s the only difference; the rest of the Program.cs file remains the same.As I sense you don’t feel like implementing your own IoC container, multiple third-party integrations already exist. Here is a non-exhaustive list taken from the official documentation:

  • Autofac
  • DryIoc
  • Grace
  • LightInject
  • Lamar
  • Stashbox
  • Simple Injector

On top of replacing the container entirely, some libraries extend the default container and add functionalities to it. We explore this option in Chapter 11, Structural Patterns.Now that we have covered most of the theory, we revisit the Strategy pattern as the primary tool to compose our applications and add flexibility to our systems.

Registering our dependencies – Dependency Injection

In ASP.NET Core, we register our dependencies in the Program.cs file, which represents the composition root. Since the minimal hosting model, the WebApplicationBuilder exposes the Services property we use to add our dependencies to the container. Afterward, .NET creates the container when it builds the WebApplication instance.Next is a minimal Program.cs file depicting this concept:

var builder = WebApplication.CreateBuilder(args);
// Register dependencies
var app = builder.Build();
// The IoC container is now available
app.Run();

Then, we use the builder.Services property to register our dependencies in that IServiceCollection implementation. Here’s an example of registering some dependencies:

builder.Services.AddSingleton<Dependency1>();
builder.Services.AddSingleton<Dependency2>();
builder.Services.AddSingleton<Dependency3>();

The preceding code registers the dependencies using the singleton lifetime, so we get the same instance each time we request one.

Remember to compose the program in the composition root. That removes the need for those pesky new keywords spread around your code base and all the tight coupling that come with them. Moreover, it centralizes the application’s composition into that location, creating the plan to assemble the LEGO® blocks.

As you may be thinking right now, that can lead to a lot of registration statements in a single location, and you are correct; maintaining such a composition root would be a challenge in almost any application. To address this concern, we introduce an elegant way to encapsulate the registration code next, ensuring it remains manageable.

Registering your features elegantly

As we’ve just discovered, while we should register dependencies in the composition root, we can also arrange our registration code in a structured manner. For example, we can break down our application’s composition into several methods or classes and invoke them from our composition root. Another strategy could be to use an auto-discovery system to automate the registration of certain services.

The critical part is to centralize the program composition in one place.

A common pattern in ASP.NET Core is having special methods like Add[Feature name]. These methods register their dependencies, letting us add a group of dependencies with just one method call. This pattern is convenient for breaking down program composition into smaller, easier-to-handle parts, like individual features. This also makes the composition root more readable.

A feature is the correct size as long as it stays cohesive. If your feature becomes too big, does too many things, or starts to share dependencies with other features, it may be time for a redesign before losing control over it. That’s usually a good indicator of undesired coupling.

To implement this pattern, we use extension methods, making it trivial. Here’s a guide:

  1. Create a static class named [subject]Extensions in the Microsoft.Extensions.DependencyInjection namespace.
  2. Create an extension method that returns the IServiceCollection interface, which allows method calls to be chained.

According to Microsoft’s recommendation, we should create the class in the same namespace as the element we extend. In our case, the IServiceCollection interface lives in the Microsoft.Extensions.DependencyInjection namespace.

Of course, this is not mandatory, and we can adapt this process to our needs. For example, we can define the class in another namespace if we want consumers to add a using statement implicitly. We can also return something else when the registration process can continue beyond that first method, like a builder interface.

Builder interfaces are used to configure more complex features, like ASP.NET Core MVC. For example, the AddControllers extension method returns an IMvcBuilder interface that contains a PartManager property. Moreover, some extension methods target the IMvcBuilder interface, allowing further configuration of the feature by requiring its registration first; that is, you can’t configure IMvcBuilder before calling AddControllers. You can also design your features to leverage that pattern when needed.

Let’s explore a demo.

What’s an object’s lifetime? – Dependency Injection

When we create an instance manually, using the new keyword, we create a hold on that object; we know when we create it and when its life ends. That’s the lifetime of the object.Of course, using the new keyword leaves no chance to control these objects from the outside, enhance them, intercept them, or swap them for another implementation—as covered in the preceding Code smell – Control Freak section.

.NET object lifetime

With dependency injection, we need to forget about controlling objects and start to think about using dependencies, or more explicitly, depending on their interfaces. In ASP.NET Core, there are three possible lifetimes to choose from:

LifetimeDescription
TransientThe container creates a new instance every time.
ScopedThe container creates an instance per HTTP request and reuses it. In some rare cases, we can also create custom scopes.
SingletonThe container creates a single instance of that dependency and always reuses that unique object.

 Table 8.1: objects lifetime description

We can now manage our volatile dependencies using one of those three scopes. Here are some questions to help you choose:

  • Do I need a single instance of my dependency? Yes? Use the singleton lifetime.
  • Do I need a single instance of my dependency shared over an HTTP request? Yes? Use the scoped lifetime.
  • Do I need a new instance of my dependency every time? Yes? Use the transient lifetime.

A general approach to object lifetime is to design the components to be singletons. When impossible, we go for scoped. When scoped is also impossible, go for transient. This way, we maximize instance reuse, lower the overhead of creating objects, lower the memory cost of keeping those objects in memory, and lower the amount of garbage collection needed to remove unused instances.

For example, we can pick singleton mindlessly for stateless objects, which are the easiest to maintain and less likely to break.

For stateful objects, where multiple consumers use the same instance, we must ensure the object is thread-safe if the lifetime is singleton or scoped because multiple consumers could try to access it simultaneously.

One essential aspect to consider when choosing a lifetime is the consumers of stateful objects. For example, if we load data related to the current user, we must ensure that data do not leak to other users. To do so, we can define the lifetime of that object to scoped, which is limited to a single HTTP request. If we don’t want to reuse that state between multiple consumers, we can choose a transient lifetime to ensure every consumer gets their own instance.

How does that translate into code? .NET offers multiple extension methods to help us configure the lifetimes of our objects, like AddTransient, AddScoped, and AddSingleton, which explicitly state their lifetimes.

We use the built-in container throughout the book with many of its registration methods, so you should grow familiar with it very quickly. It has good discoverability, so you can explore the possibilities using IntelliSense while writing code or reading the documentation.

Next, we use those methods and explore how to register dependencies with the container.

Conclusion – Strategy, Abstract Factory, and Singleton Design Patterns

The Singleton pattern allows the creation of a single instance of a class for the whole lifetime of the program. It leverages a private static field and a private constructor to achieve its goal, exposing the instantiation through a public static method or property. We can use a field initializer, the Create method itself, a static constructor, or any other valid C# options to encapsulate the initialization logic.Now let’s see how the Singleton pattern can help us (not) follow the SOLID principles:

  • S: The singleton violates this principle because it has two clear responsibilities:
    • It has the responsibility for which it has been created (not illustrated here), like any other class.
    • It has the responsibility of creating and managing itself (lifetime management).
  • O: The Singleton pattern also violates this principle. It enforces a single static instance, locked in place by itself, which limits extensibility. It is impossible to extend the class without changing its code.
  • L: There is no inheritance directly involved, which is the only good point.
  • I: No C# interface is involved, which violates this principle. However, we can look at the class interface instead, so building a small targeted singleton instance would satisfy this principle.
  • D: The singleton class has a rock-solid hold on itself. It also suggests using its static property (or method) directly without using an abstraction, breaking the DIP with a sledgehammer.

As you can see, the Singleton pattern violates all the SOLID principles but the LSP and should be used cautiously. Having only a single instance of a class and always using that same instance is a common concept. However, we explore more proper ways to do this in the next chapter, leading me to the following advice: do not use the Singleton pattern, and if you see it used somewhere, try refactoring it out.

I suggest avoiding static members that create global states as a general good practice. They can make your system less flexible and more brittle. There are occasions where static members are worth using, but try keeping their number as low as possible. Ask yourself if you can replace that static member or class with something else before coding one.

Some may argue that the Singleton design pattern is a legitimate way of doing things. However, in ASP.NET Core, I am afraid I have to disagree: we have a powerful mechanism to do it differently, called dependency injection. When using other technologies, maybe, but not with modern .NET.

Summary

In this chapter, we explored our first GoF design patterns. These patterns expose some of the essential basics of software engineering, not necessarily the patterns themselves, but the concepts behind them:

  • The Strategy pattern is a behavioral pattern that we use to compose most of our future classes. It allows swapping behavior at runtime by composing an object with small pieces and coding against interfaces, following the SOLID principles.
  • The Abstract Factory pattern brings the idea of abstracting away object creation, leading to a better separation of concerns. More specifically, it aims to abstract the creation of object families and follow the SOLID principles.
  • Even if we defined it as an anti-pattern, the Singleton pattern brings the application-level objects to the table. It allows the creation of a single instance of an object that lives for the whole lifetime of a program. The pattern violates most SOLID principles.

We also peeked at the Ambient Context code smell, which is used to create an omnipresent entity accessible from everywhere. It is often implemented as a singleton and brings a global state object to the program.The next chapter explores how dependency injection helps us compose complex yet maintainable systems. We also revisit the Strategy, the Factory, and the Singleton patterns to see how to use them in a dependency-injection-oriented context and how powerful they really are.

Fun fact – Strategy, Abstract Factory, and Singleton Design Patterns

Many years ago, before the JavaScript frameworks era, I fixed a bug in a system where some function was overriding the value of undefined due to a subtle error. This is an excellent example of how global variables could impact your whole system and make it more brittle. The same applies to the Ambient Context and Singleton patterns in C#; globals can be dangerous and annoying.

Rest assured that, nowadays, browsers won’t let developers update the value of undefined, but it was possible back then.

Now that we’ve discussed global objects, an ambient context is a global instance, usually available through a static property. The Ambient Context pattern can bring good things, but it is a code smell that smells bad.

There are a few examples in .NET Framework, such as System.Threading.Thread.CurrentPrincipal and System.Threading.Thread.CurrentThread, that are scoped to a thread instead of being purely global like most static members. An ambient context does not have to be a singleton, but that is what they are most of the time. Creating a non-global (scoped) ambient context is harder and requires more work.

Is the Ambient Context pattern good or bad? I’d go with both! It is useful primarily because of its convenience and ease of use. Most of the time, it could and should be designed differently to reduce its drawbacks.There are many ways of implementing an ambient context, but to keep it brief and straightforward, we are focusing only on the singleton version of the ambient context. The following code is a good example:

public class MyAmbientContext
{
    public static MyAmbientContext Current { get; } = new MyAmbientContext();
    private MyAmbientContext() { }
    public void WriteSomething(string something)
    {
        Console.WriteLine($”This is your something: {something}”);
    }
}

That code is an exact copy of the MySimpleSingleton class, with a few subtle changes:

  • Instance is named Current.
  • The WriteSomething method is new but has nothing to do with the Ambient Context pattern itself; it is just to make the class do something.

If we take a look at the test method that follows, we can see that we use the ambient context by calling MyAmbientContext.Current, just like we did with the last singleton implementation:

[Fact]
public void Should_echo_the_inputted_text_to_the_console()
{
    // Arrange (make the console write to a StringBuilder
    // instead of the actual console)
    var expectedText = “This is your something: Hello World!”
+ Environment.NewLine;
    var sb = new StringBuilder();
    using (var writer = new StringWriter(sb))
    {
        Console.SetOut(writer);
        // Act
        MyAmbientContext.Current.WriteSomething(“Hello World!”);
    }
    // Assert
    var actualText = sb.ToString();
    Assert.Equal(expectedText, actualText);
}

The property could include a public setter or support more complex logic. Building the right classes and exposing the right behaviors is up to you and your specifications.To conclude this interlude, avoid ambient contexts and use instantiable classes instead. We see how to replace a singleton with a single instance of a class using dependency injection in the next chapter. That gives us a more flexible alternative to the Singleton pattern. We can also create a single instance per HTTP request, which saves us the trouble of coding it while eliminating the disadvantages.

An alternate (better) way – Strategy, Abstract Factory, and Singleton Design Patterns

Previously, we used the “long way” of implementing the Singleton pattern and had to implement a thread-safe mechanism. Now that classic is behind us. We can shorten that code and even get rid of the Create() method like this:

public class MySimpleSingleton
{
    public static MySimpleSingleton Instance { get; } = new MySimpleSingleton();
    private MySimpleSingleton() { }
}

The preceding code relies on the static initializer to ensure that only one instance of the MySimpleSingleton class is created and assigned to the Instance property.

This simple technique should do the trick unless the singleton’s constructor executes some heavy processing.

With the property instead of a method, we can use the singleton class like this:

MySimpleSingleton.Instance.SomeOperation();

We can prove the correctness of that claim by executing the following test method:

[Fact]
public void Create_should_always_return_the_same_instance()
{
    var first = MySimpleSingleton.Instance;
    var second = MySimpleSingleton.Instance;
    Assert.Same(first, second);
}

It is usually best to delegate responsibilities to the language or the framework whenever possible like we did here with the property initializer. Using a static constructor would also be a valid, thread-safe alternative, once again delegating the job to language features.

Beware of the arrow operator.

It may be tempting to use the arrow operator => to initialize the Instance property like this: public static MySimpleSingleton Instance => new MySimpleSingleton();, but doing so would return a new instance every time. This would defeat the purpose of what we want to achieve. On the other hand, the property initializer runs only once.

The arrow operator makes the Instance property an expression-bodied member, equivalent to creating the following getter: get { return new MySimpleSingleton(); }. You can consult Appendix A for more information about expression-bodies statements.

Before we conclude the chapter, the Singleton (anti-)pattern also leads to a code smell.

Code smell – Ambient Context

That last implementation of the Singleton pattern led us to the Ambient Context pattern. We could even call the Ambient Context an anti-pattern, but let’s just state that it is a consequential code smell.I do not recommend using ambient contexts for multiple reasons. First, I do my best to avoid anything global; an ambient context is a global state. Globals, like static members in C#, can look very convenient because they are easy to access and use. They are always there and accessible whenever needed: easy. However, they bring many drawbacks in terms of flexibility and testability.When using an ambient context, the following occurs:

  • Tight coupling: global states lead to less flexible systems; consumers are tightly coupled with the ambient context.
  • Testing difficulty: global objects are harder to replace, and we cannot easily swap them for other objects, like a mock.
  • Unforseen impacts: if some part of your system messes up your global state, that may have unexpected consequences on other parts of your system, and you may have difficulty finding out the root cause of those errors.
  • Potential misuse: developers could be tempted to add non-global concerns to the ambient context, leading to a bloated component.

The Singleton design pattern – Strategy, Abstract Factory, and Singleton Design Patterns

The Singleton design pattern allows creating and reusing a single instance of a class. We could use a static class to achieve almost the same goal, but not everything is doable using static classes. For example, a static class can’t implement an interface. We can’t pass an instance of a static class as an argument because there is no instance. We can only use static classes directly, which leads to tight coupling every time.The Singleton pattern in C# is an anti-pattern, and we should rarely use it, if ever, and use dependency injection instead. That said, it is a classic design pattern worth learning to at least avoid implementing it. We explore a better alternative in the next chapter.Here are a few reasons why we are covering this pattern:

  • It translates into a singleton scope in the next chapter.
  • Without knowing about it, you cannot locate it, try to remove it, or avoid its usage.
  • It is a simple pattern to explore.
  • It leads to other patterns, such as the Ambient Context pattern.

Goal

The Singleton pattern limits the number of instances of a class to one. Then, the idea is to reuse the same instance subsequently. A singleton encapsulates both the object logic itself and its creational logic. For example, the Singleton pattern could lower the cost of instantiating an object with a large memory footprint since the program instantiates it only once.Can you think of a SOLID principle that gets broken right there?The Singleton pattern promotes that one object must have two responsibilities, breaking the Single Responsibility Principle (SRP). A singleton is the object itself and its own factory.

Design

This design pattern is straightforward and is limited to a single class. Let’s start with a class diagram:

 Figure 7.6: Singleton pattern class diagramFigure 7.6: Singleton pattern class diagram 

The Singleton class is composed of the following:

  • A private static field that holds its unique instance.
  • A public static Create() method that creates or returns the unique instance.
  • A private constructor, so external code cannot instantiate it without passing by the Create method.

You can name the Create() method anything or even get rid of it, as we see in the next example. We could name it GetInstance(), or it could be a static property named Instance or bear any other relevant name.

We can translate the preceding diagram to the following code:

public class MySingleton
{
    private static MySingleton?
_instance;
    private MySingleton() { }
    public static MySingleton Create()
    {
        _instance ??= new MySingleton();
        return _instance;
    }
}

The null-coalescing assignment operator ??= assigns the new instance of MySingleton only if the _instance member is null. That line is equivalent to writing the following if statement:

if (_instance == null)
{
    _instance = new MySingleton();
}

Before discussing the code more, let’s explore our new class’s behavior. We can see in the following unit test that MySingleton.Create() always returns the same instance as expected:

public class MySingletonTest
{
    [Fact]
    public void Create_should_always_return_the_same_instance()
    {
        var first = MySingleton.Create();
        var second = MySingleton.Create();
        Assert.Same(first, second);
    }
}

And voilà! We have a working Singleton pattern, which is extremely simple—probably the most simple design pattern that I can think of.Here is what is happening under the hood:

  1. The first time that a consumer calls MySingleton.Create(), it creates the first instance of MySingleton. Since the constructor is private, it can only be created from the inside.
  2. The Create method then persists that first instance to the _instance field for future use.
  3. When a consumer calls MySingleton.Create() a second time, it returns the _instance field, reusing the class’s previous (and only) instance.

Now that we understand the logic, there is a potential issue with that design: it is not thread-safe. If we want our singleton to be thread-safe, we can lock the instance creation like this:

public class MySingletonWithLock
{
    private static readonly object _myLock = new();
    private static MySingletonWithLock?
_instance;
    private MySingletonWithLock() { }
    public static MySingletonWithLock Create()
    {
        lock (_myLock)
        {
            _instance ??= new MySingletonWithLock();
        }
        return _instance;
    }
}

In the preceding code, we ensure two threads are not attempting to access the Create method simultaneously to ensure they are not getting different instances. Next, we improve our thread-safe example by making it shorter.

Project – The mid-range vehicle factory – Strategy, Abstract Factory, and Singleton Design Patterns

To prove the flexibility of our design based on the Abstract Factory pattern, let’s add a new concrete factory named MidRangeVehicleFactory. That factory should return a MidRangeCar or a MidRangeBike instance. Once again, the car and bike are just empty classes (of course, in your programs, they will do something):

public class MiddleGradeCar : ICar { }
public class MiddleGradeBike : IBike { }

The new MidRangeVehicleFactory looks pretty much the same as the other two:

public class MidRangeVehicleFactory : IVehicleFactory
{
    public IBike CreateBike() => new MiddleGradeBike();
    public ICar CreateCar() => new MiddleGradeCar();
}

Now, to test the mid-range factory, we declare the following test class:

namespace Vehicles.MidRange;
public class MidRangeVehicleFactoryTest : BaseAbstractFactoryTest<MidRangeVehicleFactory, MidRangeCar, MidRangeBike>
{
}

Like the low-end and high-end factories, the mid-range test class depends on the BaseAbstractFactoryTest class and specifies the types to test for (highlighted).If we run the tests, we now have the following six passing tests:

 Figure 7.5: Visual Studio Test Explorer showcasing the six passing tests.Figure 7.5: Visual Studio Test Explorer showcasing the six passing tests. 

So, without updating the consumer (the AbstractFactoryTest class), we added a new family of vehicles, the middle-end cars and bikes; kudos to the Abstract Factory pattern for that wonderfulness!

Impacts of the Abstract Factory

Before concluding, what would happen if we packed everything in a large interface instead of using an Abstract Factory (breaking the ISP along the way)? We could have created something like the following interface:

public interface ILargeVehicleFactory
{
    HighEndBike CreateHighEndBike();
    HighEndCar CreateHighEndCar();
    LowEndBike CreateLowEndBike();
    LowEndCar CreateLowEndCar();
}

As we can see, the preceding interface contains four specific methods and seems docile. However, the consumers of that code would be tightly coupled with those specific methods. For example, to change a consumer’s behavior, we’d need to update its code, like changing the call from CreateHighEndBike to CreateLowEndBike, which breaks the OCP. On the other hand, with the factory method, we can set a different factory for the consumers to spit out different results, which moves the flexibility out of the object itself and becomes a matter of composing the object graph instead (more on that in the next chapter).Moreover, when we want to add mid-range vehicles, we must update the ILargeVehicleFactory interface, which becomes a breaking change (the implementation(s) of the ILargeVehicleFactory must be updated). Here’s an example of the two new methods:

public interface ILargeVehicleFactory
{
    HighEndBike CreateHighEndBike();
    HighEndCar CreateHighEndCar();
    LowEndBike CreateLowEndBike();
    LowEndCar CreateLowEndCar();
    MidRangeBike CreateMidRangeBike();
    MidRangeCar CreateMidRangeCar();
}

From there, once the implementation(s) are updated, if we want to consume the new mid-range vehicles, we need to open each consumer class and apply the changes there, which once again breaks the OCP.

The most crucial part is understanding and seeing the coupling and its impacts. Sometimes, it’s okay to tightly couple one or more classes together as we don’t always need the added flexibility the SOLID principles and some design patterns can bring.

Now let’s conclude before exploring the last design pattern of the chapter.

Conclusion

The Abstract Factory pattern is excellent for abstracting away the creation of object families, isolating each family and its concrete implementation, leaving the consumers unaware of the family created at runtime by the factory.We talk more about factories in the next chapter; meanwhile, let’s see how the Abstract Factory pattern can help us follow the SOLID principles:

  • S: Each concrete factory is solely responsible for creating a family of objects. You could combine Abstract Factory with other creational patterns, such as the Prototype and Builder patterns for more complex creational needs.
  • O: We can create new families of objects, like the mid-range vehicles, without breaking existing client code.
  • L: We aim at composition, so there’s no need for any inheritance, implicitly discarding the need for the LSP. If you use abstract classes in your design, you must ensure you don’t break the LSP when creating new abstract factories.
  • I: Extracting a small abstraction with many implementations where each concrete factory focuses on one family makes that interface very focused on one task instead of having a large interface that exposes all types of products (like the ILargeVehicleFactory interface).
  • D: By depending only on interfaces, the consumer is unaware of the concrete types it uses.

Next, we explore the last design pattern of the chapter.

Conclusion– Strategy, Abstract Factory, and Singleton Design Patterns

The Strategy design pattern is very effective at delegating responsibilities to other objects, allowing you to hand over the responsibility of an algorithm to other objects while keeping its usage trivial. It also allows having a rich interface (context) with behaviors that can change at runtime.As we can see, the Strategy pattern is excellent at helping us follow the SOLID principles:

  • S: It helps extract responsibilities from external classes and use them interchangeably.
  • O: It allows extending classes without updating its code by changing the current strategy at runtime, which is pretty much the actual definition of the OCP.
  • L: It does not rely on inheritance. Moreover, it plays a large role in the composition over inheritance principle, helping us avoid inheritance altogether and the LSP.
  • I: By creating smaller strategies based on lean and focused interfaces, the Strategy pattern is an excellent enabler of the ISP.
  • D: The creation of dependencies is moved from the class using the strategy (the context) to the class’s consumer. That makes the context depend on abstraction instead of implementation, inverting the flow of control.

C# Features

If you noticed C# features you are less familiar with, Appendix A explains many of them briefly.

Next, let’s explore the Abstract Factory pattern.

The Abstract Factory design pattern

The Abstract Factory design pattern is a creational design pattern from the GoF. We use creational patterns to create other objects, and factories are a very popular way of doing that.The Strategy pattern is the backbone of dependency injection, enabling the composition of complex object trees, while factories are used to create some of those complex objects that can’t be assembled automatically by a dependency injection library. More on that in the next chapter.

Goal

The Abstract Factory pattern is used to abstract the creation of a family of objects. It usually implies the creation of multiple object types within that family. A family is a group of related or dependent objects (classes).Let’s think about creating automotive vehicles. There are multiple vehicle types, and there are multiple models and makes for each type. We can use the Abstract Factory pattern to model this sort of scenario.

Note

The Factory Method pattern also focuses on creating a single type of object instead of a family. We only cover Abstract Factory here, but we use other types of factories later in the book.

Design

With Abstract Factory, the consumer asks for an abstract object and gets one. The factory is an abstraction, and the resulting objects are also abstractions, decoupling the creation of an object from its consumers.That allows adding or removing families of objects produced together without impacting the consumers (all actors communicate through abstractions).In our case, the family (the set of objects the factory can produce) is composed of a car and a bike, and each factory (family) must produce both objects.If we think about vehicles, we could have the ability to create low- and high-end models of each vehicle type. Here is a diagram representing how to achieve that using the Abstract Factory pattern:

 Figure 7.4: Abstract Factory class diagramFigure 7.4: Abstract Factory class diagram 

In the diagram, we have the following elements:

  • The IVehicleFactory interface represents the Abstract Factory. It defines two methods: one that creates cars of type ICar and another that creates bikes of type IBike.
  • The HighEndVehicleFactory class is a concrete factory implementing the IVehicleFactory interface. It handles high-end vehicle model creation, and its methods return HighEndCar or HighEndBike instances.
  • The LowEndVehicleFactory is a second concrete factory implementing the IVehicleFactory interface. It handles low-end vehicle model creation, and its methods return LowEndCar or LowEndBike instances.
  • LowEndCar and HighEndCar are two implementations of ICar.
  • LowEndBike and HighEndBike are two implementations of IBike.

Based on that diagram, consumers use the concrete factories through the IVehicleFactory interface and should not be aware of the implementation used underneath. Applying this pattern abstracts away the vehicle creation process.