Category Directory structure

Conclusion – Model-View-Controller

A data transfer object allows us to design an API endpoint with a specific data contract (input and output) instead of exposing the domain or data model. This separation between the presentation and the domain is a crucial element that leads to having multiple independent components instead of a bigger, more fragile one. Using DTOs to control the inputs and outputs gives us more control over what the clients can do or receive.Using the data transfer object pattern helps us follow the SOLID principles in the following ways:

  • S: A DTO adds clear boundaries between the domain model and the API contract. Moreover, having an input and an output DTO help further separate the responsibilities.
  • O: N/A
  • L: N/A
  • I: A DTO is a small, specifically crafted data contract (abstraction) with a clear purpose in the API contract.
  • D: Due to those smaller interfaces (ISP), DTOs allow changing the implementation details of the endpoint without affecting the clients because they depend only on the API contract (an abstraction).

You have learned DTOs’ added value, their role in an API contract, and the ASP.NET Core MVC framework.

Summary

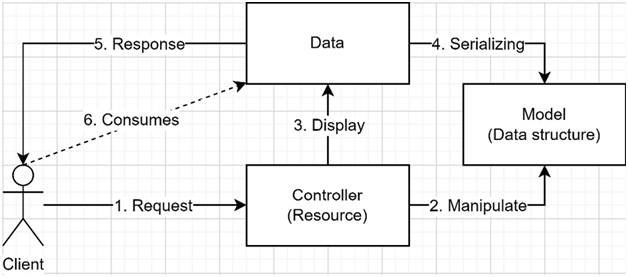
This chapter explored the Model-View-Controller (MVC) design pattern, a well-established framework in the ASP.NET ecosystem that offers more advanced features than its newer Minimal APIs counterpart. Minimal APIs are not competing against MVC; we can use them together. The MVC pattern emphasizes the separation of concerns, making it a proven pattern for creating maintainable, scalable, and robust web applications. We broke down the MVC pattern into its three core components: Models, Views, and Controllers. Models represent data and business logic, Views are user-facing components (serialized data structures), and Controllers act as intermediaries, mediating the interaction between Models and Views. We also discussed using Data Transfer Objects (DTOs) to package data in the format we need, providing many benefits, including flexibility, efficiency, encapsulation, and improved performance. DTOs are a crucial part of the API contract.Now that we have explored principles and methodologies, it is time to continue our learning and tackle more design patterns and features. The following two chapters explore our first Gang of Four (GoF) design patterns and deep dive into ASP.NET Core dependency injection (DI). All of this will help us to continue on the path we started: to learn the tools to design better software.

Raw CRUD Controller – Model-View-Controller

Many issues can arise if we create a CRUD controller to manage the customers directly (see RawCustomersController.cs). First, a little mistake from the client could erase several data points. For example, if the client forgets to send the contracts during a PUT operation, that would delete all the contracts associated with that customer. Here’s the controller code:

// PUT raw/customers/1
[HttpPut(“{id}”)]
public async Task<ActionResult<Customer>> PutAsync(
    int id,
    [FromBody] Customer value,
    ICustomerRepository customerRepository)
{
    var customer = await customerRepository.UpdateAsync(
        value,
        HttpContext.RequestAborted);
    if (customer == null)
    {
        return NotFound();
    }
    return customer;
}

The highlighted code represents the customer update. So to mistakenly remove all contracts, a client could send the following HTTP request (from the MVC.API.http file):

PUT {{MVC.API.BaseAddress}}/customers/1
Content-Type: application/json
{
  “id”: 1,
  “name”: “Some new name”,
  “contracts”: []
}

That request would result in the following response entity:

{
  “id”: 1,
  “name”: “Some new name”,
  “contracts”: []
}

Previously, however, that customer had contracts (seeded when we started the application). Here’s the original data:

{
  “id”: 1,
  “name”: “Jonny Boy Inc.”,
  “contracts”: [
    {
      “id”: 1,
      “name”: “First contract”,
      “description”: “This is the first contract.”,
      “status”: {
        “totalWork”: 100,
        “workDone”: 100,
        “state”: “Completed”
      },
      “primaryContact”: {
        “firstName”: “John”,
        “lastName”: “Doe”,
        “email”: “[email protected]
      }
    },
    {
      “id”: 2,
      “name”: “Some other contract”,
      “description”: “This is another contract.”,
      “status”: {
        “totalWork”: 100,
        “workDone”: 25,
        “state”: “InProgress”
      },
      “primaryContact”: {
        “firstName”: “Jane”,
        “lastName”: “Doe”,
        “email”: “[email protected]
      }
    }
  ]
}

As we can see, by exposing our entities directly, we are giving a lot of power to the consumers of our API. Another issue with this design is the dashboard. The user interface would have to calculate the statistics about the contracts. Moreover, if we implement paging the contracts over time, the user interface could become increasingly complex and even overquery the database, hindering our performance.

I implemented the entire API, which is available on GitHub but without UI.

Next, we explore how we can fix those two use cases using DTOs.

Directory structure – Model-View-Controller-1

The default directory structure contains a Controllers folder to host the controllers. On top of that, we can create a Models folder to store your model classes or use any other structure.

While controllers are typically housed in the Controllers directory for organizational purposes, this convention is more for the benefit of developers than a strict requirement. ASP.NET Core is indifferent to the file’s location, offering us the flexibility to structure our project as we see fit.

Section 4, Applications Patterns, explores many ways of designing applications.

Next, we look at the central part of this pattern—the controllers.

Controller

The easiest way to create a controller is to create a class inheriting from ControllerBase. However, while ControllerBase adds many utility methods, the only requirement is to decorate the controller class with the [ApiController] attribute.

By convention, we write the controller’s name in its plural form and suffix it with Controller. For example, if the controller relates to the Employee entity, we’d name it EmployeesController, which, by default, leads to an excellent URL pattern that is easy to understand:

  • Get all employees: /employees
  • Get a specific employee: /employees/{id}
  • And so on.

Once we have a controller class, we must add actions. Actions are public methods that represent the operations that a client can perform. Each action represents an HTTP endpoint.More precisely, the following defines a controller:

  • A controller exposes one or more actions.
  • An action can take zero or more input parameters.
  • An action can return zero or one output value.
  • The action is what handles the HTTP request.

We should group cohesive actions under the same controller, thus creating a loosely coupled unit.

For example, the following represents the SomeController class containing a single Get action:

[Route(“api/[controller]”)]
[ApiController]
public class SomeController : ControllerBase
{
    [HttpGet]
    public IActionResult Get() => Ok();
}

The preceding Get method (action) returns an empty 200 OK response to the client. We can reach the endpoint at the /api/some URI. From there, we can add more actions.

The ControllerBase class gives us access to most of the same utility methods as we had with the Minimal APIs TypedResults class.

Next, we look at returning value.

Returning values

Building a REST API aims to return data to clients and execute remote operations. Most of the plumbing is done for us by the ASP.NET Core code, including serialization.

Most of the ASP.NET Core pipeline is customizable, which is out of the scope of this chapter.

Before returning values, let’s look at a few valuable helper methods provided by the ControllerBase class:

MethodDescription
StatusCodeProduces an empty response with the specified status code. We can optionally include a second argument to serialize in the response body.
OkProduces a 200 OK response, indicating the operation was successful. We can optionally include a second argument to serialize in the response body.
CreatedProduces a 201 Created response, indicating the system created the entity. We can optionally specify the location where to read the entity and the entity itself as arguments. The CreatedAtAction and CreatedAtRoute methods give us options to compose the location value.
NoContentProduces an empty 204 No Content response.
NotFoundProduces a 404 Not Found response, indicating the resource was not found.
BadRequestProduces a 400 Bad Request response, indicating an issue with the client request, often a validation error.
RedirectProduces a 302 Found response, accepting the Location URL as an argument. Different Redirect* methods produce 301 Moved Permanently, 307 Temporary Redirect, and 308 Permanent Redirect responses instead.
AcceptedProduces a 202 Accepted response, indicating the beginning of an asynchronous process. We can optionally specify the location the client can query to learn about the status of the asynchronous operation. We can also optionally specify an object to serialize in the response body. The AcceptedAtAction and AcceptedAtRoute methods give us options to compose the location value.
ConflictProduces a 409 Conflict response, indicating a conflict occurred when processing the request, often a concurrency error.

 Table 6.1: a subset of the ControllerBase methods producing an IActionResult.

Other methods in the ControllerBase class are self-discoverable using IntelliSense (code completion) or in the official documentation. Most, if not all, of what we covered in Chapter 5, Minimal APIs, is also available to controllers.

Goal – Model-View-Controller

In the context of REST APIs, the MVC pattern aims to streamline the process of managing an entity by breaking it down into three separate, interacting components. Rather than struggling with large, bloated blocks of code that are hard to test, developers work with smaller units that enhance maintainability and promote efficient testing. This compartmentalization results in small, manageable pieces of functionality that are simpler to maintain and test.

Design

MVC divides the application into three distinct parts, where each has a single responsibility:

  • Model: The model represents the data and business logic we are modeling.
  • View: The view represents what the user sees. In the context of REST APIs, that usually is a serialized data structure.
  • Controller: The controller represents a key component of MVC. It orchestrates the flow between the client request and the server response. The primary role of the controller is to act as an HTTP bridge. Essentially, the controller facilitates the communication in and out of the system.

The code of a controller should remain minimalistic and not contain complex logic, serving as a thin layer between the clients and the domain.

We explore alternative points of view in Chapter 14, Layering and Clean Architecture.

Here is a diagram that represents the MVC flow of a REST API:

 Figure 6.1: Workflow of a REST API using MVCFigure 6.1: Workflow of a REST API using MVC 

In the preceding diagram, we send the model directly to the client. In most scenarios, this is not ideal. We generally prefer sending only the necessary data portion, formatted according to our requirements. We can design robust API contracts by leveraging the Data Transfer Object (DTO) pattern to achieve that. But before we delve into that, let’s first explore the basics of ASP.NET Core MVC.

Anatomy of ASP.NET Core web APIs

There are many ways to create a REST API project in .NET, including the dotnet new webapi CLI command, also available from Visual Studio’s UI. Next, we explore a few pieces of the MVC framework, starting with the entry point.

The entry point

The first piece is the entry point: the Program.cs file. Since .NET 6, there is no more Startup class by default, and the compiler autogenerates the Program class. As explored in the previous chapter, using the minimal hosting model leads to a simplified Program.cs file with less boilerplate code.Here is an example:

using Shared;
using System.Text.Json.Serialization;
var builder = WebApplication.CreateBuilder(args);
builder.Services.AddCustomerRepository();
builder.Services
    .AddControllers()
    .AddJsonOptions(options => options
        .JsonSerializerOptions
        .Converters
        .Add(new JsonStringEnumConverter())
    )
;
builder.Services.AddEndpointsApiExplorer();
builder.Services.AddSwaggerGen();
var app = builder.Build();
if (app.Environment.IsDevelopment())
{
    app.UseSwagger();
    app.UseDarkSwaggerUI();
}
app.MapControllers();
app.InitializeSharedDataStore();
app.Run();

In the preceding Program.cs file, the highlighted lines identify the minimum code required to enable ASP.NET Core MVC. The rest is very similar to the Minimal APIs code.

The Model View Controller design pattern – Model-View-Controller

Before you begin: Join our book community on Discord

Give your feedback straight to the author himself and chat to other early readers on our Discord server (find the “architecting-aspnet-core-apps-3e” channel under EARLY ACCESS SUBSCRIPTION).

https://packt.link/EarlyAccess

This chapter delves into the Model-View-Controller (MVC) design pattern, a cornerstone of modern software architecture that intuitively structures your code around entities. MVC is perfect for CRUD operations or to tap into the advanced features unavailable in Minimal APIs. The MVC pattern partitions your application into three interrelated parts: Models, Views, and Controllers.

  • Models, which represent our data and business logic.
  • Views, which are the user-facing components.
  • Controllers, that act as intermediaries, mediating the interaction between Models and Views.

With its emphasis on the separation of concerns, the MVC pattern is a proven pattern for creating scalable and robust web applications. In the context of ASP.NET Core, MVC has provided a practical approach to building applications efficiently for years. While we discussed REST APIs in Chapter 4, this chapter provides insight into how to use MVC to create REST APIs. We also address using Data Transfer Objects (DTOs) within this framework.In this chapter, we cover the following topics:

  • The Model-View-Controller design pattern
  • Using MVC with DTOs

Our ultimate goal is clean, maintainable, and scalable code; the ASP.NET Core MVC framework is a favored tool for achieving this. Let’s dive in!

The Model View Controller design pattern

Now that we have explored the basics of REST and Minimal APIs, it is time to explore the MVC pattern to build ASP.NET Core REST APIs.Model-View-Controller (MVC) is a design pattern commonly used in web development. It has a long history of building REST APIs in ASP.NET and is widely used and praised by many.This pattern divides an application into three interconnected components: the Model, the View, and the Controller. A View in MVC formerly represented a user interface. However, in our case, the View is a data contract that reflects the REST API’s data-oriented nature.

Dividing responsibilities this way aligns with the Single Responsibility Principle (SRP) explored in Chapter 3, Architectural Principles. However, this is not the only way to build REST APIs with ASP.NET Core, as we saw in Chapter 5, Minimal APIs.

The new minimal API model mixed with the Request-EndPoint-Response (REPR) pattern can make building REST APIs leaner. We cover that pattern in Chapter 18, Request-EndPoint-Response (REPR). We could see REPR as what ASP.NET Core Razor Pages are to page-oriented web applications, but for REST APIs.

We often design MVC applications around entities, and each entity has a controller that orchestrates its endpoints. We called those CRUD controllers. However, you can design your controller to fit your needs.In the past few decades, the number of REST APIs just exploded to a gazillion; everybody builds APIs nowadays, not because people follow the trend but based on good reasons. REST APIs have fundamentally transformed how systems communicate, offering various benefits that make them indispensable in modern software architecture. Here are a few key factors that contribute to their widespread appeal:

  • Data Efficiency: REST APIs promote efficient data sharing across different systems, fostering seamless interconnectivity.
  • Universal Communication: REST APIs leverage universally recognized data formats like JSON or XML, ensuring broad compatibility and interoperability.
  • Backend Centralization: REST APIs enable the backend to serve as a centralized hub, supporting multiple frontend platforms, including mobile, desktop, and web applications.
  • Layered Backends: REST APIs facilitate the stratification of backends, allowing for the creation of foundational, low-level APIs that provide basic functionalities. These, in turn, can be consumed by higher-level, product-centric APIs that offer specialized capabilities, thus promoting a flexible and modular backend architecture.
  • Security Measures: REST APIs can function as gateways, providing security measures to protect downstream systems and ensuring data access is appropriately regulated—a good example of layering APIs.
  • Encapsulation: REST APIs allow for the encapsulation of specific units of logic into reusable, independent modules, often leading to cleaner, more maintainable code.
  • Scalability: due to their stateless nature, REST APIs are easier to scale up to accommodate increasing loads.

These advantages greatly facilitate the reuse of backend systems across various user interfaces or even other backend services. Consider, for instance, a typical mobile application that needs to support iOS, Android, and web platforms. By utilizing a shared backend through REST APIs, development teams can streamline their efforts, saving significant time and cost. This shared backend approach ensures consistency across platforms while reducing the complexity of maintaining multiple codebases.

We explore different such patterns in Chapter 19, Introduction to Microservices Architecture.

Conclusion – Minimal API

A data transfer object allows us to design an API endpoint with a specific data contract (input and output) instead of exposing the domain or data model. This separation between the presentation and the domain is a crucial element that leads to having multiple independent components instead of a bigger, more fragile one.We use DTOs to control the endpoints’ inputs and outputs, giving us more control over what the clients can do or receive.Using the data transfer object pattern helps us follow the SOLID principles in the following ways:

  • S: A DTO adds clear boundaries between the domain or data model and the API contract. Moreover, having an input and an output DTO help further separate the responsibilities.
  • O: N/A
  • L: N/A
  • I: A DTO is a small, specifically crafted data contract (abstraction) with a clear purpose in the API contract.
  • D: Due to those smaller interfaces (ISP), DTOs allow changing the implementation details of the endpoint without affecting the clients because they depend only on the API contract (the abstraction).

You should now understand the added value of DTOs and what part in an API contract they play. Finally, you should have a strong base of Minimal APIs possibilities.

Summary

Throughout the chapter, we explored ASP.NET Core Minimal APIs and their integration with the DTO pattern. Minimal APIs simplify web application development by reducing boilerplate code. The DTO pattern helps us decouple the API contract from the application’s inner workings, allowing flexibility in crafting REST APIs. DTOs can also save bandwidth and flatten or change data structures. Endpoints exposing their domain or data entities directly can lead to issues, while DTO-enabled endpoints offer better control over data exchanges. We also discussed numerous Minimal APIs aspects, including input binding, outputting data, metadata, JSON serialization, endpoint filters, and endpoint organization. With this foundational knowledge, we can begin to design ASP.NET Core minimal APIs.

For more information about Minimal APIs and what they have to offer, you can visit the Minimal APIs quick reference page of the official documentation: https://adpg.link/S47i

In the next chapter, we revisit the same notions in an ASP.NET Core MVC context.

Using Minimal APIs with Data Transfer Objects – Minimal API

This section explores leveraging the Data Transfer Object (DTO) pattern with minimal APIs.

This section is the same as we explore in Chapter 6, MVC, but in the context of Minimal APIs. Moreover, the two code projects are part of the same Visual Studio solution for convenience, allowing you to compare the two implementations.

Goal

As a reminder, DTOs aim to control the inputs and outputs of an endpoint by decoupling the API contract from the application’s inner workings. DTOs empower us to define our APIs without thinking about the underlying data structures, leaving us to craft our REST APIs how we want.

We discuss REST APIs and DTOs more in-depth in Chapter 4, REST APIs.

Other possible objectives are to save bandwidth by limiting the amount of information the API transmits, flattening the data structure, or adding API features that cross multiple entities.

Design

Let’s start by analyzing a diagram that shows how minimal APIs work with DTOs:

 Figure 5.4: An input DTO hitting some domain logic, then the endpoint returning an output DTOFigure 5.4: An input DTO hitting some domain logic, then the endpoint returning an output DTO 

DTOs allow the decoupling of the domain (3) from the request (1) and the response (5). This model empowers us to manage the inputs and outputs of our REST APIs independently from the domain. Here’s the flow:

  1. The client sends a request to the server.
  2. ASP.NET Core leverages its data binding and parsing mechanism to convert the information of the HTTP request to C# (input DTO).
  3. The endpoint does what it is supposed to do.
  4. ASP.NET Core serializes the output DTO to the HTTP response.
  5. The client receives and handles the response.

Let’s explore some code to understand the concept better.

Project – Minimal API

This code sample is the same as the next chapter but uses Minimal APIs instead of the MVC framework.Context: we must build an application to manage customers and contracts. We must track the state of each contract and have a primary contact in case the business needs to contact the customer. Finally, we must display the number of contracts and the number of opened contracts for each customer on a dashboard.The model is the following:

namespace Shared.Models;
public record class Customer(
    int Id,
    string Name,
    List<Contract> Contracts
);
public record class Contract(
    int Id,
    string Name,
    string Description,
    WorkStatus Status,
    ContactInformation PrimaryContact
);
public record class WorkStatus(int TotalWork, int WorkDone)
{
    public WorkState State =>
        WorkDone == 0 ?
WorkState.New :
        WorkDone == TotalWork ?
WorkState.Completed :
        WorkState.InProgress;
}
public record class ContactInformation(
    string FirstName,
    string LastName,
    string Email
);
public enum WorkState
{
    New,
    InProgress,
    Completed
}

The preceding code is straightforward. The only piece of logic is the WorkStatus.State property that returns WorkState.New when the work has not yet started on that contract, WorkState.Completed when all the work is completed, or WorkState.InProgress otherwise.The endpoints (CustomersEndpoints.cs) leverage the ICustomerRepository interface to simulate database operations. The implementation is unimportant. It uses a List<Customer> as the database. Here’s the interface that allows querying and updating the data:

using Shared.Models;
namespace Shared.Data;
public interface ICustomerRepository
{
    Task<IEnumerable<Customer>> AllAsync(
        CancellationToken cancellationToken);
    Task<Customer> CreateAsync(
        Customer customer,
        CancellationToken cancellationToken);
    Task<Customer?> DeleteAsync(
        int customerId,
        CancellationToken cancellationToken);
    Task<Customer?> FindAsync(
        int customerId,
        CancellationToken cancellationToken);
    Task<Customer?> UpdateAsync(
        Customer customer,
        CancellationToken cancellationToken);
}

Now that we know about the underlying foundation, we explore CRUD endpoints that do not leverage DTOs.